


⏳ Master Your Time, Master Your Life!
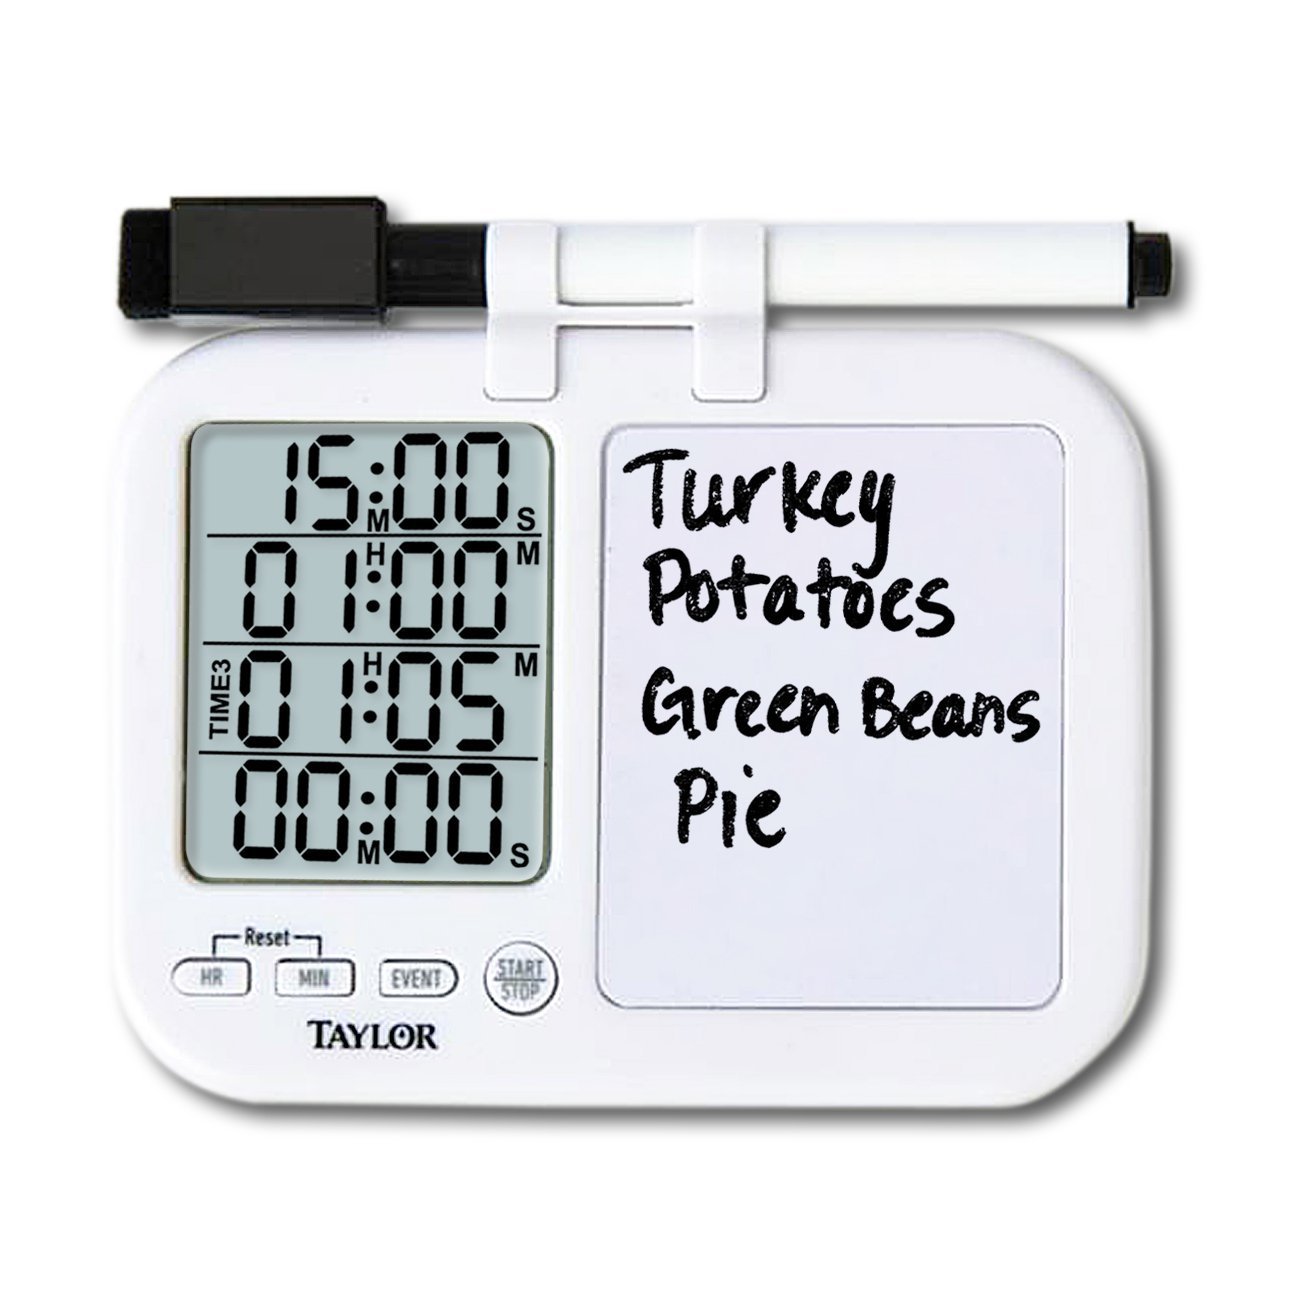
The Taylor5849 Four-Event Digital Timer is a versatile and innovative tool designed for multitasking in various environments, from the kitchen to the classroom. With the ability to track four separate events simultaneously, a built-in whiteboard for notes and reminders, and a clear LCD display, this timer is perfect for anyone looking to enhance their productivity and organization.


| Material Type | Plastic |
| Color | White |
| Item Weight | 22.68 g |
| Item Dimensions D x W x H | 1"D x 7.5"W x 5.5"H |
J**C
Very useful and flexible timer
I really like this timer. I actually got it to count how much time a pottery kiln was operating (at high power, and at low power) so I could figure out how much electricity was being used. For this purpose, I use two timers, both in count-up mode, but only one timer actively counting (the high-power timer, or the low-power timer, depending on how the kiln is set). A pottery kiln needs to operate for many hours, and this timer can count to more than 24 hours. But I also use the timer in the kitchen for various purposes. For example, sometimes I'm far enough away from the microwave that I can't hear the beep when it's done. So I set a timer to count down the desired time value, and carry the timer with me into the other room so it can remind me when the microwave is done. Also, it's common for microwave cooking instructions to tell you to let the food stand for five or ten minutes after the microwave shuts off. In this case, I set the timer at the same time I start the microwave, but set the timer for five or ten minutes longer. Then I can just wait for the timer to beep, indicating dinner is ready.There are four separate timers, each of which can count-up or count-down, and each of which can be set, started, paused/resumed, stopped, or reset, independently from the other timers. The operational buttons only affect one timer, and you select which of the four timers by pressing the EVENT button. This shows a "TIME" icon in front of the timer you will be affecting, and the icon moves from one timer to another as you repeatedly press the EVENT button.To make a timer count down, press the HR and MIN buttons as desired to set an initial time value. You can press HR or MIN repeatedly, or you can hold down the button to scroll the value quickly. The minutes value scrolls to 59 then wraps around to 00 without affecting hours. The hours value scrolls to 24 then wraps around to zero. Therefore the biggest count-down time you can enter is 24 hours and 59 minutes. You can not enter seconds, you can only enter whole minutes. However as the timer counts down, once it gets below one minute, it will show the final seconds counting down, you just can't enter seconds for an initial value.To start the count down, press the START/STOP button and the time value will start counting down. You can press the START/STOP button again to pause the timer, then press START/STOP again to resume, as many times as you want. When the count reaches all zeros, the timer starts beeping, and will beep for quite a while until you press START/STOP.Any timer that displays 00 hours 00 minutes 00 seconds will operate as a count-up timer. The easiest way to get all zeros is to reset the timer (see below). Once the time value has been reset to all zeros, press START/STOP and the timer will start counting up, press START/STOP again to pause, again to resume, etc. Also, once an active count-down timer counts down to all zeros and starts beeping, it also automatically starts counting up, until you press START/STOP to stop the timer (and the beeping).To reset a single timer, press the HR and MIN buttons together, and the timer with the TIME icon will reset to all zeros. To reset all four timers, press the HR, MIN, and EVENT buttons together. Note that an actively counting timer won't reset, you have to pause the timer first before resetting it.It's important to note that all four timers are independent, and the button presses only affect the timer that has the TIME icon in front of it. So for example, you can set an HR/MIN value in timer 1 to make it count down, and start it counting, then reset timer 2 to all zeros to make it count up, and start it counting, then set timer 3 to count down, but a different value than timer 1, and start it counting, then reset timer 4 to all zeros but leave it inactive. Then you can pause timer 1, then pause timer 2, all without affecting timer 3 or 4, then resume timer 2, then resume timer 1, then pause and reset timer 1, then start counting up on timer 4, etc. Just remember to press the EVENT button to select the desired timer before you use any of the other buttons.There are a few relatively minor issues:- It has no on/off switch, so once you put the batteries in (two AAA batteries, which are included), the display stays on continuously. This used to bother me, and I used to take the batteries out, but eventually I got tired of doing that and decided just to leave it on all the time.- There is no backlight, so the display can be hard to read in dim light.- It has a couple of magnets on the back so you can stick it on your refrigerator, but this is not a very secure mounting method so I don't use it. While you are pressing buttons on the timer, it can slide around a bit, and even pop off the refrigerator and fall.- It has a tilt-out arm in the plastic base so you can stand the timer up, but the tilt-out arm is so flimsy I'm sure it would break right away, so I don't use it. You don't really need a stand - you can press the buttons just fine while the timer is laying on a flat surface, or while holding it in your hand.As an engineer, I think it's a pretty neat and powerful gizmo, and if I was a kid, it would be a pretty cool kid toy.
H**
Great item
My prior one died after years of use. Love theses timers
M**K
Is my vision going too now?
It says this is white in many places on the posting, but the one I got - which, sadly, was not the same as the great one I had bought before - was a very light lavender. Is someone trying to tell me something? I'm a geriatric vet. What am I going to do with a light lavender timer? See how long it takes for my Barbie collection to melt? It got 5 stars for the simple reason that it works just as well as the old one I lost.
A**R
A must have for a kitchen!
This thing is amazing! It has saved our food! LOL. For baking, or even doing dinner, we have a timer for each thing we are doing. The fact you can write next to it exactly what it is, makes it so much easier to keep track of everything. It is one less thing you have to keep track of! It is nice and loud, easy to use, and the battery has lasted a long time.
F**T
It's Just Okay
It's alright. The magnets didn't function well - kept sliding down my fridge. I ended up using a command strip to adhere it where I wanted. Loud enough. The white board was convenient. After about 6 months it died - the numbers got all funky and couldn't set it. The readability was fine otherwise. Didn't have to replace the batteries once in the 6 months I had it (I used Eneloop recharables). Ended up going with another brand sans whiteboard.
S**.
Great little timer!
This is a great little timer. Dimensions are: 4.5 wide x 3.75 high x 0.875 thick inches. The stylus and holder (both of which can be removed from the timer) are about 0.5 inch, so the timer could be 4.5 wide x 3.25 high x 0.875 thick inches. Weight of the timer + the two included AAA 1.5 volt batteries, is 3.37 ounces. The LCD digits are 0.375 inch tall. There are four completely independent timers. The timer setting can be cleared by pressing HR and MIN buttons simultaneously. Example: To set Timer 1, Press the Enter Button repeatedly until Timer 1 is chosen, Clear the setting if required, Press HR button repeatedly for number of hours (up to 24 hours), Press MIN button repeatedly for number of minutes (up to 59 minutes), then Press Start/Stop Button. Each button pressing is identified by a low-frequency beep. After the timer reaches the set time, a high frequency beep is produced and the timer continues counting positively (time past set time). The individual timers are identified once they reach the set time by a high frequency beep by the number of beeps...one beep is Timer 1, two beeps is Timer 2, etc.. The timer identification beeping continues until you stop the individual timer using the Start/Stop button. The timers can't be set in seconds, only hours and minutes, but once a timer starts timing, you can press the Run/Start button (used as a Pause) and the seconds can be controlled...that is, once the timer reaches less than 1 hour...the display would show minutes and seconds. If you really need to time in seconds, you could set timer to 1 minute, then wait until the setting of seconds is reached...then start from there. A bit confusing. There are two strong 0.25 inch diameter magnets on the back of the timer. I got a white unit. I really haven't tried the writing pad yet. The beeper is quite loud if placed upon a hard surface.
S**E
Stopped working after 2 weeks.
I bought a first one. I never dropped it and treated it with care. A month later, it stopped working and wouldn’t work even after putting new batteries in it. I stupidly bought a second one. It stopped working after barely 2 weeks of purchase. I’m disappointed.
Trustpilot
2 weeks ago
3 weeks ago


