🚗 Keep Your Cool on the Road!
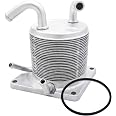
The Hayden Aluminum Automotive 403 Ultra-Cool Tube and Fin Transmission Cooler is engineered for mid-size and full-size vehicles, providing exceptional cooling performance with a compact design. With a maximum pressure rating of 150 PSI and advanced turbulators, this cooler ensures your transmission operates at peak efficiency, making it a must-have for towing and heavy-duty applications.

| Brand | Hayden Automotive |
| Material | Aluminum |
| Color | Gray, Silver |
| Product Dimensions | 12.5"L x 12.5"W |
| Item Weight | 1.8 Pounds |
| Maximum Pressure | 150 Pound per Square Inch |
| Nominal Wall Thickness | 1 |
| Outside Diameter | 0.75 Inches |
| Item Length | 12.5 Inches |
| UPC | 036752004034 |
| Manufacturer | Hayden Automotive |
| Global Trade Identification Number | 00036752004034 |
| Model | 403 |
| Item Weight | 1.8 pounds |
| Country of Origin | USA |
| Item model number | 403 |
| Is Discontinued By Manufacturer | No |
| Manufacturer Part Number | 403 |
R**S
Family
Great iteam
J**N
Helps keep the trans fluid cool! Works!
Going strong! Helped save my 2004 Volvo XC70 AW55 transmission! Prior to install I had rough shifting after the transmission got really warm from stop/go traffic. Now I have much more faith in my vehicle.
A**S
Excelente!
Excelente, encajó perfecto en la parte frontal de mi carro, y ayudó muchísimo a mejorar la temperatura de la caja CVT. 100% recomendado Nissan Juke 2011 SV AWD
D**T
Hayden 403 cooler installed on 1997 Mazda 626LX 2.0L 4 cylinder
I had a very alarming incident that I attributed to a transmission problem recently (not at all sure I could make it home) and my online investigation revealed that my car (and other Mazda 1993-2002 626's, and probably some others) were given a Ford CD4E transmission that was designed for significantly lighter cars. The early failure rate of that transmission in these Mazdas (mine is 3800 lb), is quite high. One Mazda technician told me that among those in the know, it's called the 60k transmission. Mazda issued a couple of bulletins around 2000 indicating that an external transmission fluid cooler was recommended, however it was to be done on the customer's dime. I decided to DIY it.I think that Hayden should have supplied at least another foot of hose. The return line from the cooler to the transmission that was already there (coming previously from the radiator), was barely long enough to reach the cooler. 1 inch less and it would not have reached. If it had not reached, the ~4 foot length of hose supplied in the kit may have been barely enough, when cut to produce the two necessary connections (the first being from the radiator's transmission fluid outlet to the cooler's input, the second being from the cooler's output back to the transmission), maybe not.Hayden in the instructions indicates two possibilities:Series (your fluid first goes through it's former cooling, being through your radiator)Separate (you bypass the radiator for whatever reason, presumably because your radiator has a problem)I did series, the recommended method.I finished the install yesterday, and I made the job harder than necessary. I'll explain. Firstly, I opted not to the install as suggested in the included instructions.They have 3 suggested placements:1. In front of the AC condensor, which is in front of the radiator2. Between the AC Condensor and the radiator3. Behind the radiator.#1 is recommended because it affords the most efficient cooling, and that is what I opted to do. However, before I installed I was guided to a thread that shows an installation including diagrams and photographs:[mazda626 dot net/topic/24936-external-trans-cooler/?p=352865]The thread shows a method utilizing homemade brackets that stand off the cooler from the AC condensor, generating better air flow to both the cooler and the AC condensor. I decided I liked that approach. However I made some mistakes, and only realized it after committing to them. I succeeded in finishing the install in a satisfactory manner, however if you do this or something similar I have a few suggestions:1. Assemble the cooler to the brackets before mounting the assembly to the vehicle.2. Affix the hoses to the cooler next.3. Only then, mount the assembly to the vehicle.Doing things in that order will make the installation far easier than the way I did it. Now, the way I did it took incredibly longer than the "average 1/2 hour" that the instructions indicated. Of course, if you make your own brackets, it's going to take you a lot longer too, but if you do things in the order I indicate and don't run into problems it shouldn't be too tough. Safety first!
H**R
Good product
Great product. Works great
W**2
Can't be beat for the price!
Install took about 30 min on a 2004 Grand Cherokee with the 4.7 non-HO and the 545rfe trans. I used fuel clamps in lieu of the included worm gear clamps, as they are a more positive grip without cutting into the hose if you were to over tighten them. I also used a 6AN fiberglass braid covered poly line, mostly because it looks better. However, having included my upgrades, you can still buy with confidence and use what the kit supplies. I have installed several Hayden coolers over the years with what was in the kit without issue.Techtip: If your vehicle has a factory tow package, it likely already has a cooler in your radiator. Assuming that doesn't have a leak, it is generally recommended that you still use the factory cooler in conjunction with the aux Hayden cooler to prevent over cooling. A lot of trannys are designed to run at a certain temp - over cooling, especially in winter, may prevent your trans from shifting into overdrive(s) thus killing your MPG. From trans: to factory cooler, then aux cooler, then return to trans. Also, if you are mounting with the in/outlets horizontal, be sure and use the lower connection as the inlet. This ensures the entire cooler fills without air. If you use the top as the inlet, you can get a "waterfall" effect, filling cooler capacity with air and reducing its efficiency. You can install vertical as well, but in that case be sure and put the in/oulets on the top to prevent the same effect.
P**
A new cooler and a radiator for any Nissan Sentra CVT transmission is a must if you plan on keeping
A new cooler and a radiator for any Nissan Sentra CVT transmission is a must if you plan on keeping in a long time I put pictures on here looks like they went away my 2017 Nissan Sentra S 1.8 L It only came with a cooler that has two prongs coming out of it for cooling the CVT transmission I bought one has four and added the cooler radiator this made a world of difference it’s a must before doing this the car that has only 30,000 miles on it still like brand new when you get to 75 miles an hour it felt like you couldn’t go faster after I install those two parts car runs like it should. You also need to replace the CVT transmission fluid every 35 to 40,000 miles this means a new round filter under the driver tire and a new pan filter in your transmission pan this car takes about 9 quarts of CBT oil but you add three at a time drain itPut three back in start it put your brakes on and go through all the gears really slow five seconds each gear repeat the process drain put 3 quarts in to you equal 9 quarts there’s a video on YouTube explain this better that’s my experience with my Nissan besides that thank it’s gonna be a good car now
L**E
If you have an early to late 90’s GM truck/SUV this is what you need to get
I purchased this transmission cooler for my 1995 Chevrolet blazer, because when I would tow my trailer, the transmission fluid would get to hot and cause the transmission to jerk when it would shift. I put this transmission cooler on and drove around town with my trailer and I didn’t have anymore issues with my transmission shifting hard/jerking.
Trustpilot
1 month ago
5 days ago